IKEA · Beds
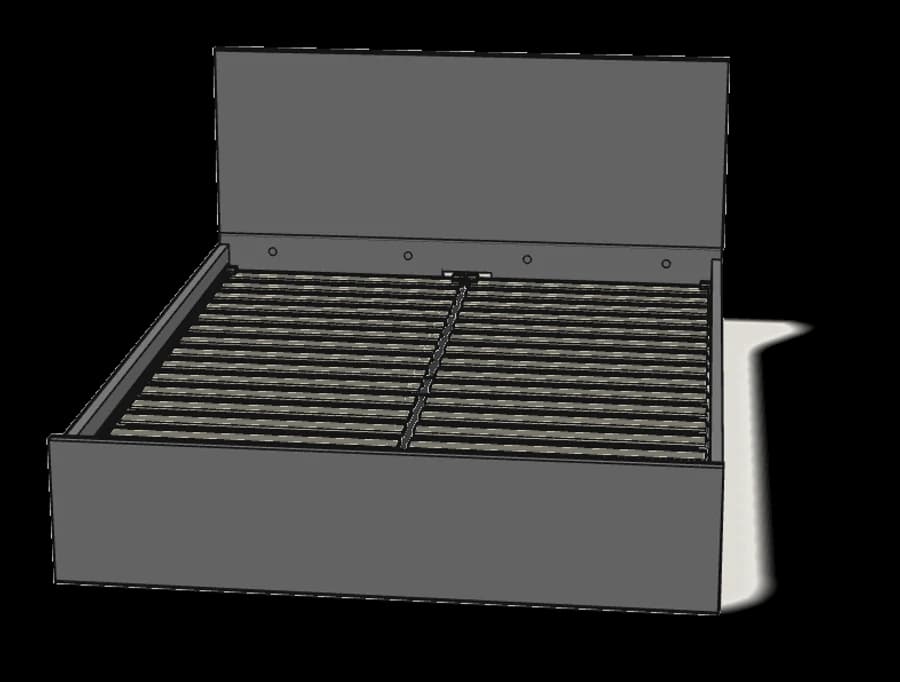
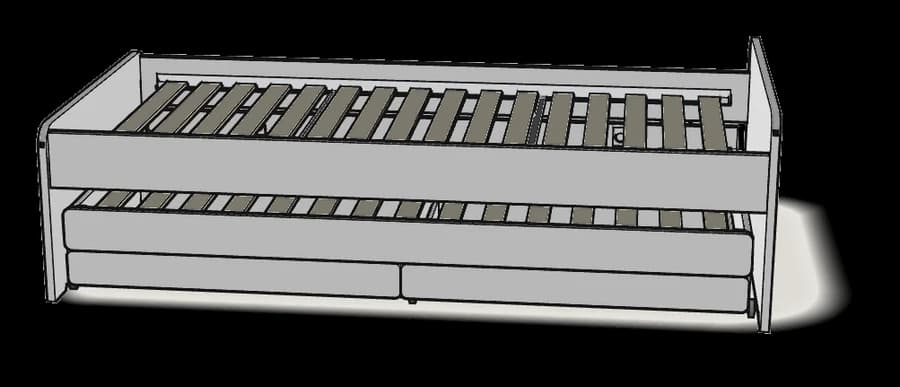
How to Assemble IKEA SLÄKT Bed Frame W/ Pull-Out Bed + Storage
Step-by-step IKEA SLÄKT bed frame w/ pull-out bed + storage assembly: 26 illustrated steps, an animated video, the hardware list and the tools you need — following the official instructions (AA-2000760-7 + AA-2007924-5).
- 26 illustrated steps
- 3:30 video
- 206×104×62 cm
What you need
Tools
- Flat-head screwdriver
- Phillips screwdriver
- Hammer
Hardware in the box
| Part no. (as printed in the manual) | Qty |
|---|---|
| 105236 | 8× |
| 104895 | 8× |
| 101359 | 14× |
| 110789 | 16× |
| 117327 | 6× |
| 105163 | 6× |
| 191315 | 8× |
| 122628 | 4× |
| 119030 | 14× |
| 118331 | 14× |
| 101345 | 9× |
| 100211 | 5× |
| 100218 | 6× |
| 146114 | 24× |
| 105307 | 16× |
| 107628 | 2× |
| 108443 | 12× |
| 100358 | 8× |
| 110519 | 8× |
| 100359 | 4× |
Step-by-step assembly
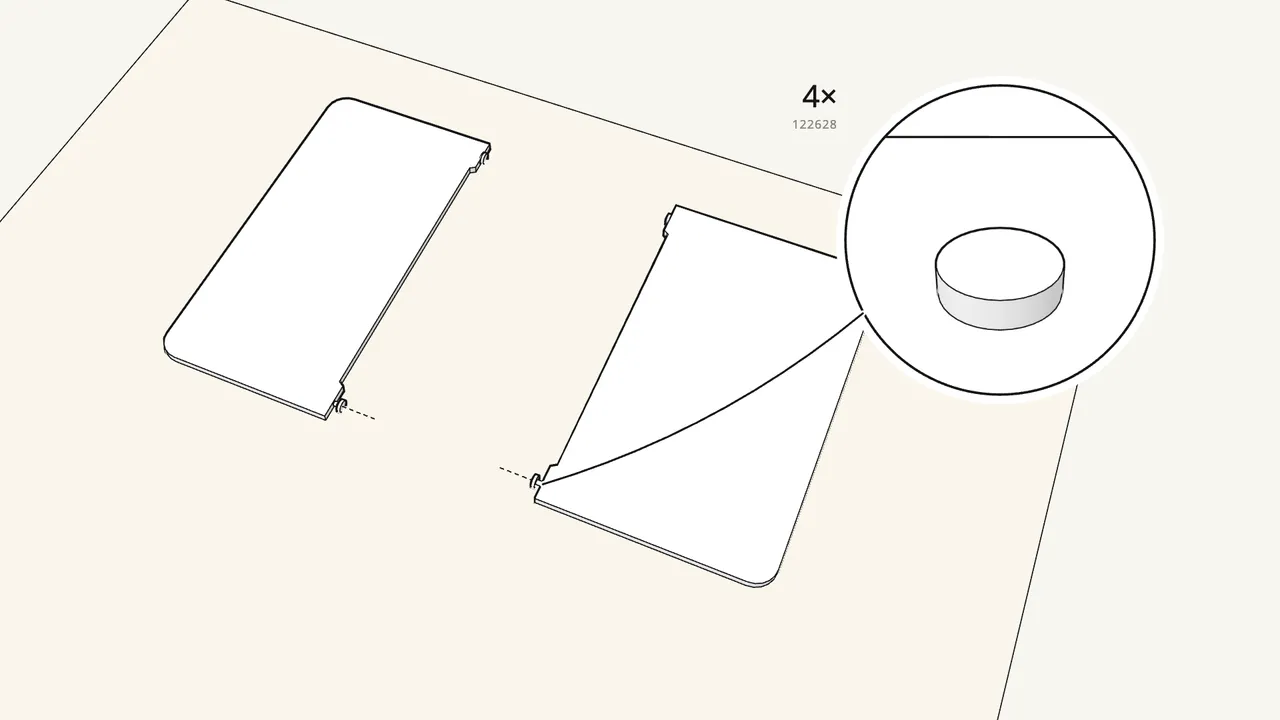
Step 1
Bed frame: tap 4 glides (122628) into the head- and footboard.
Lay both panels on the rug; 2 glides in the bottom edge of each, with the hammer.
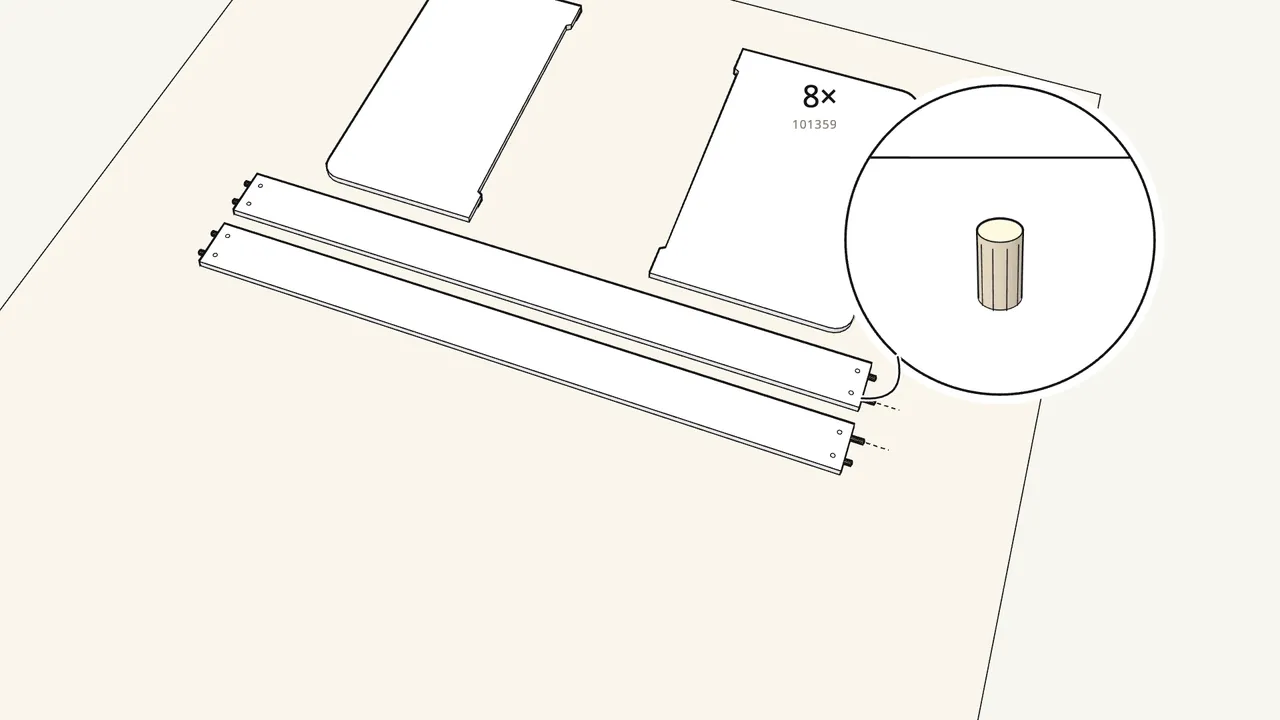
Step 2
Push 8 dowels (101359) into the ends of the side rails.
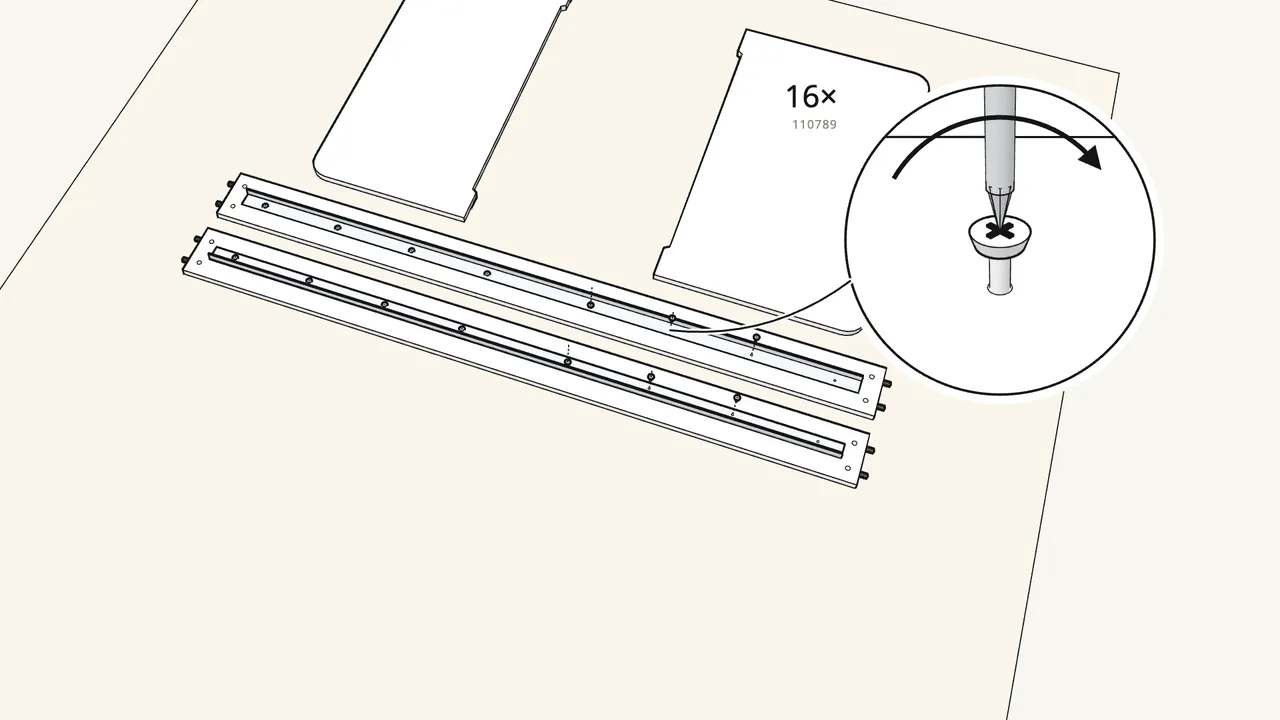
Step 3
Screw the 2 metal slat rails onto the side rails.
16 screws (110789), 8 per rail, by hand in the order shown. No power drill.
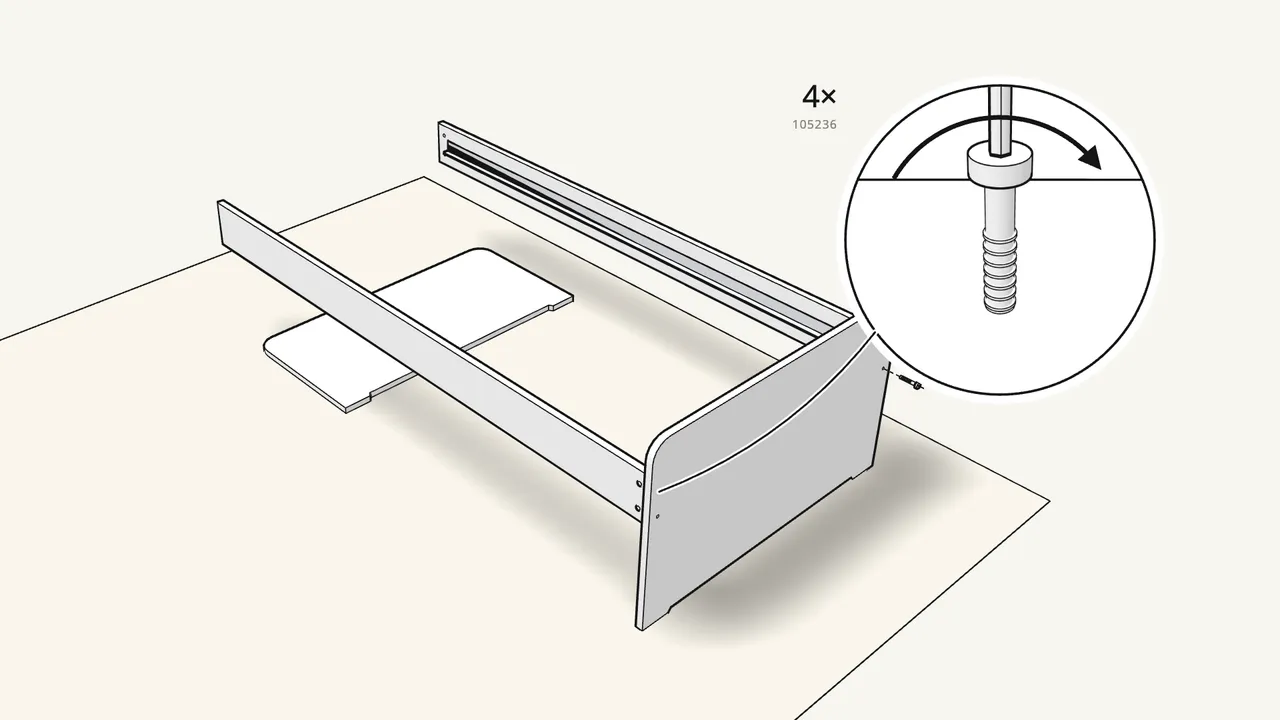
Step 4 · manual step 4–5
With 2 people, fit both side rails to the headboard.
4 bolts (105236) into barrel nuts (104895). Line the nuts up with the flat screwdriver, tighten with the Allen key.
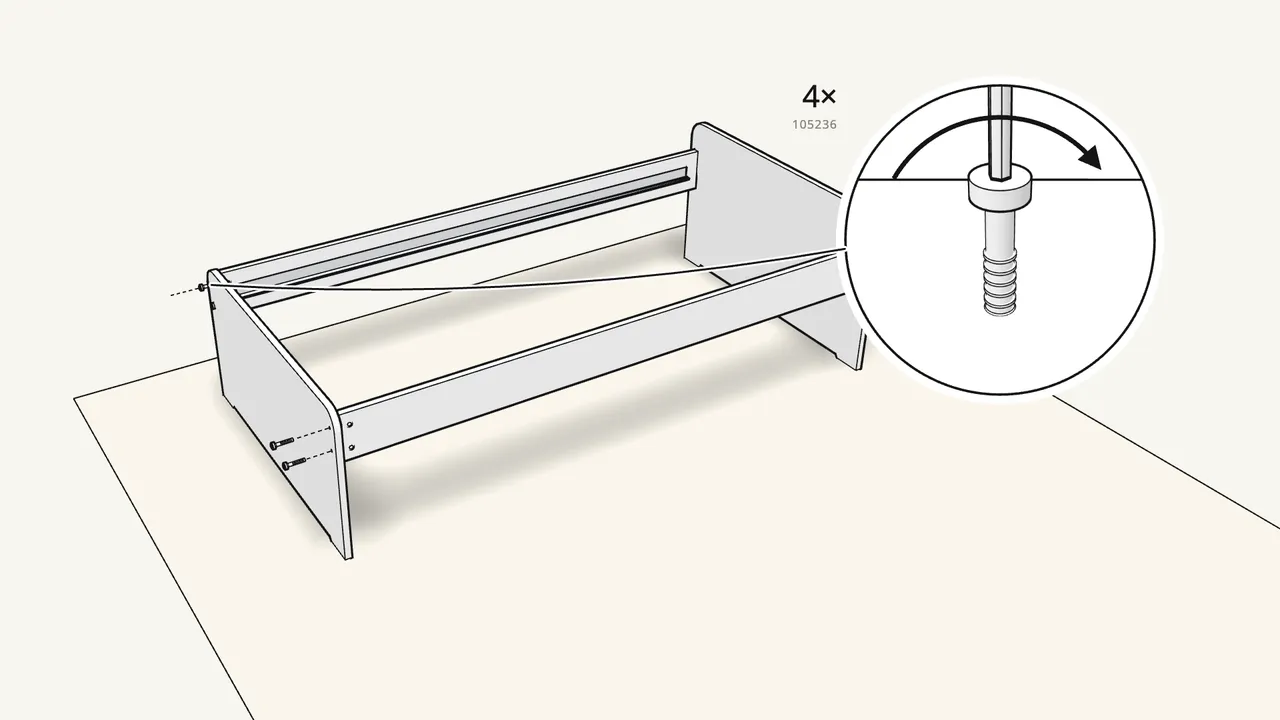
Step 5 · manual step 6–7
Fit the footboard the same way.
4 more bolts (105236) and barrel nuts (104895).
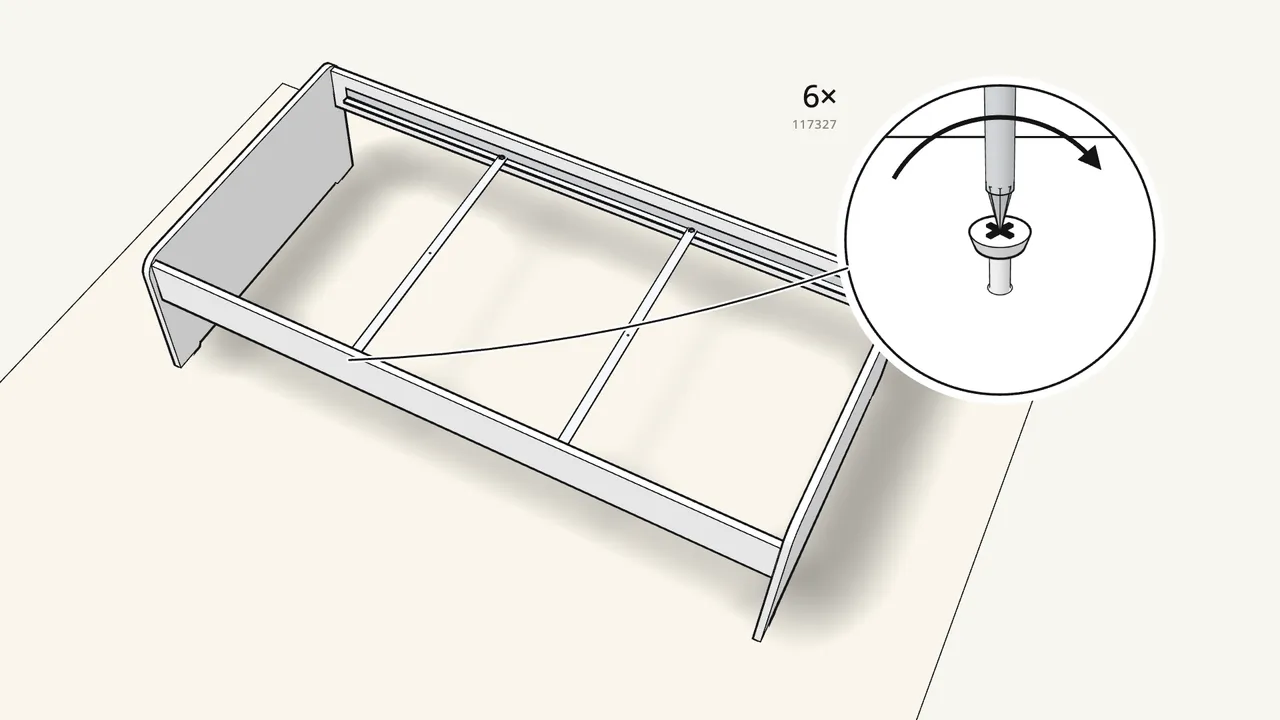
Step 6 · manual step 8–9
Pull out the 2 centre bars (117228) and screw them on.
4 screws (117327) at the ends, then 1 in the middle of each bar.
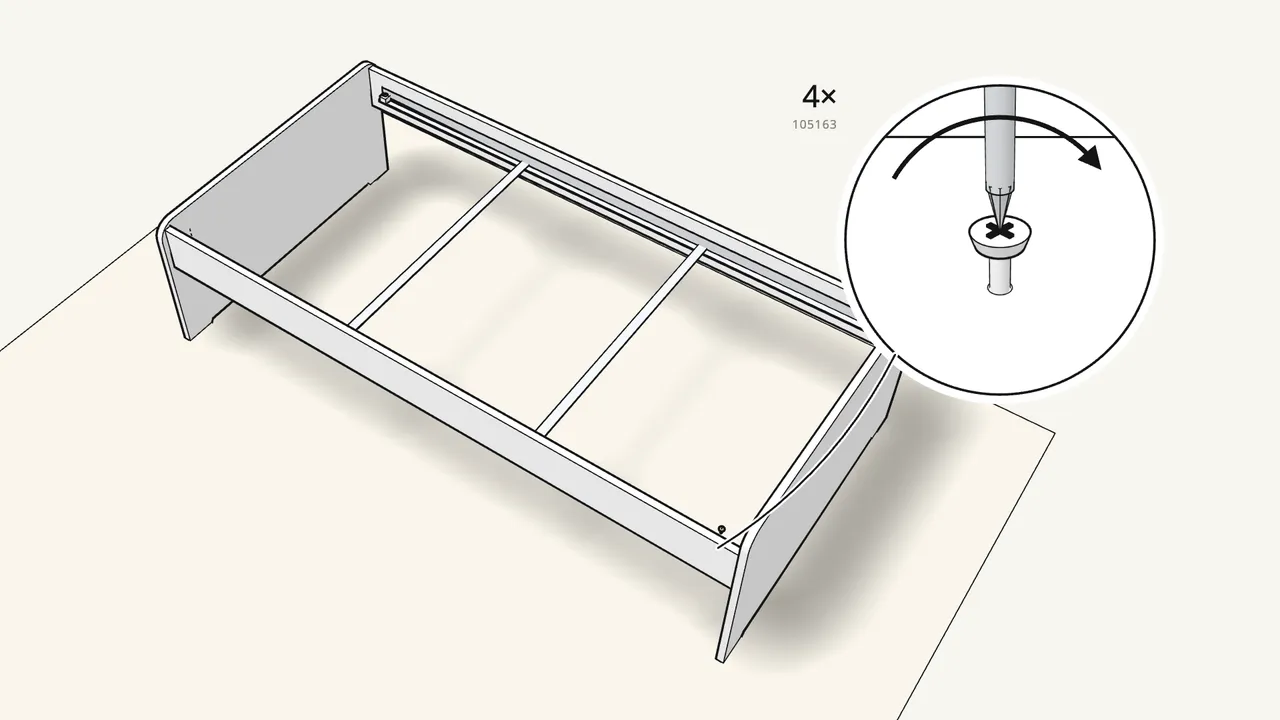
Step 7 · manual step 10
Screw on the 4 slat holders (191315).
4 screws (105163), 2 at each end of the bed.
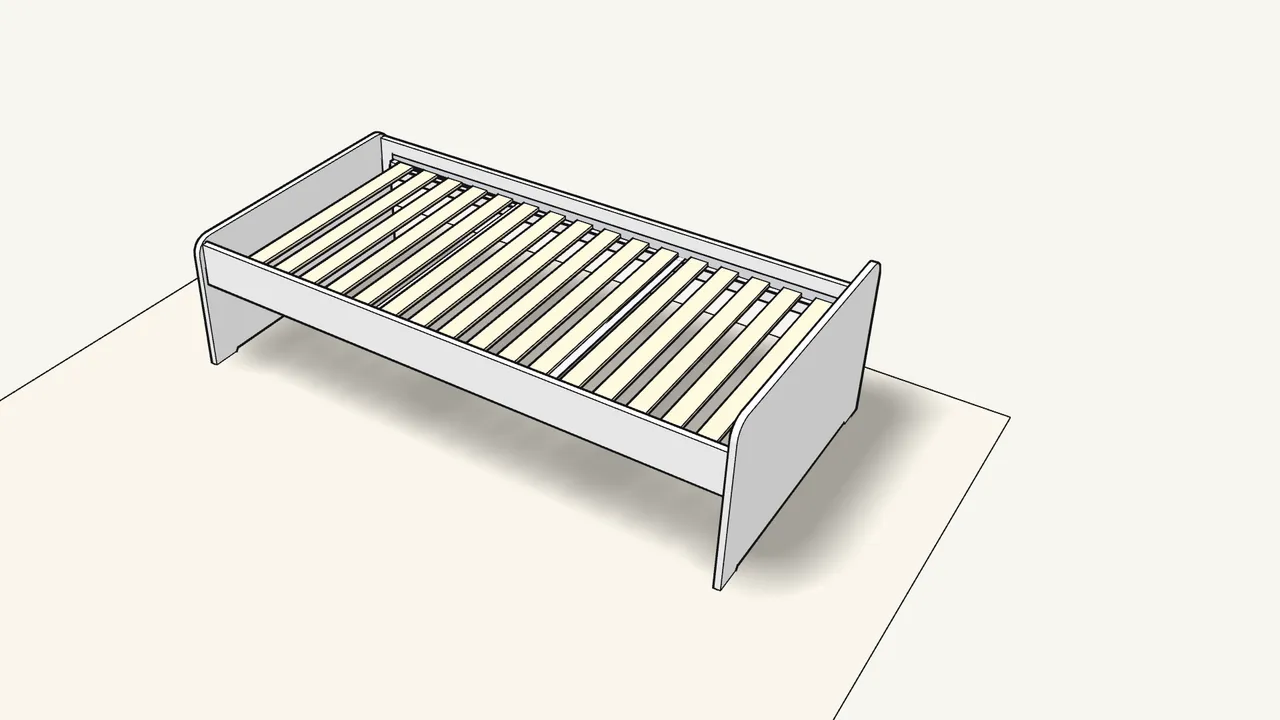
Step 8 · manual step 11–12
Lay in the slatted bed base, curved side up.
Tuck its 4 end straps under the slat holders.
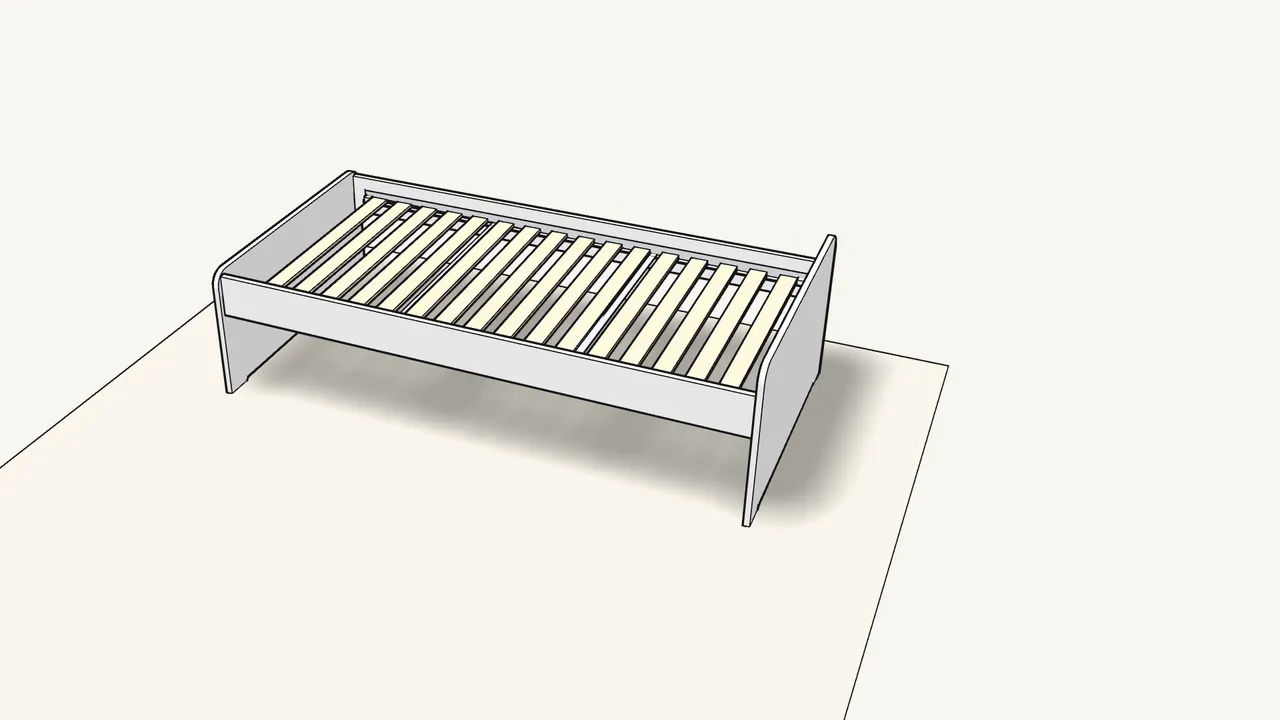
Step 9
Now the pull-out bed.
It has its own manual (AA-2007924-5) — step numbers start again at 1.
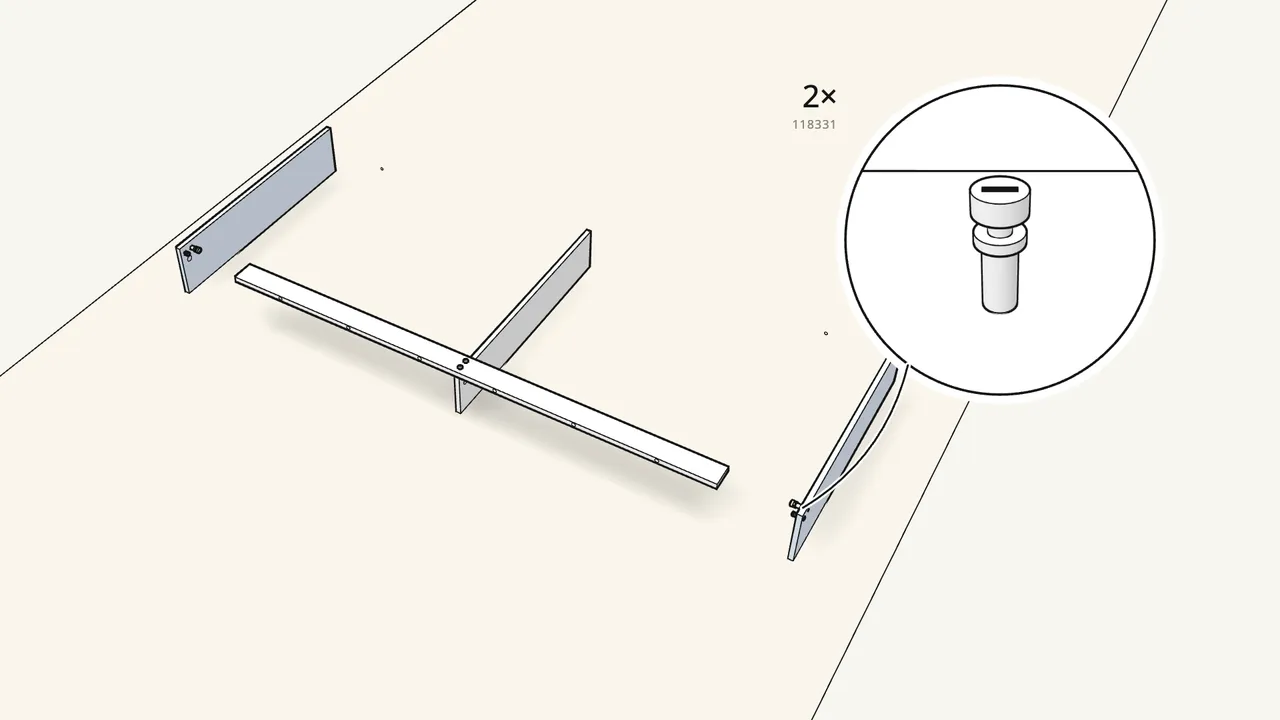
Step 10 · manual step 1–3
Screw the front rail onto the divider: 2 screws (100211).
Then 1 cam bolt (118331) + 1 dowel (101345) in each end panel. Push the ends on.
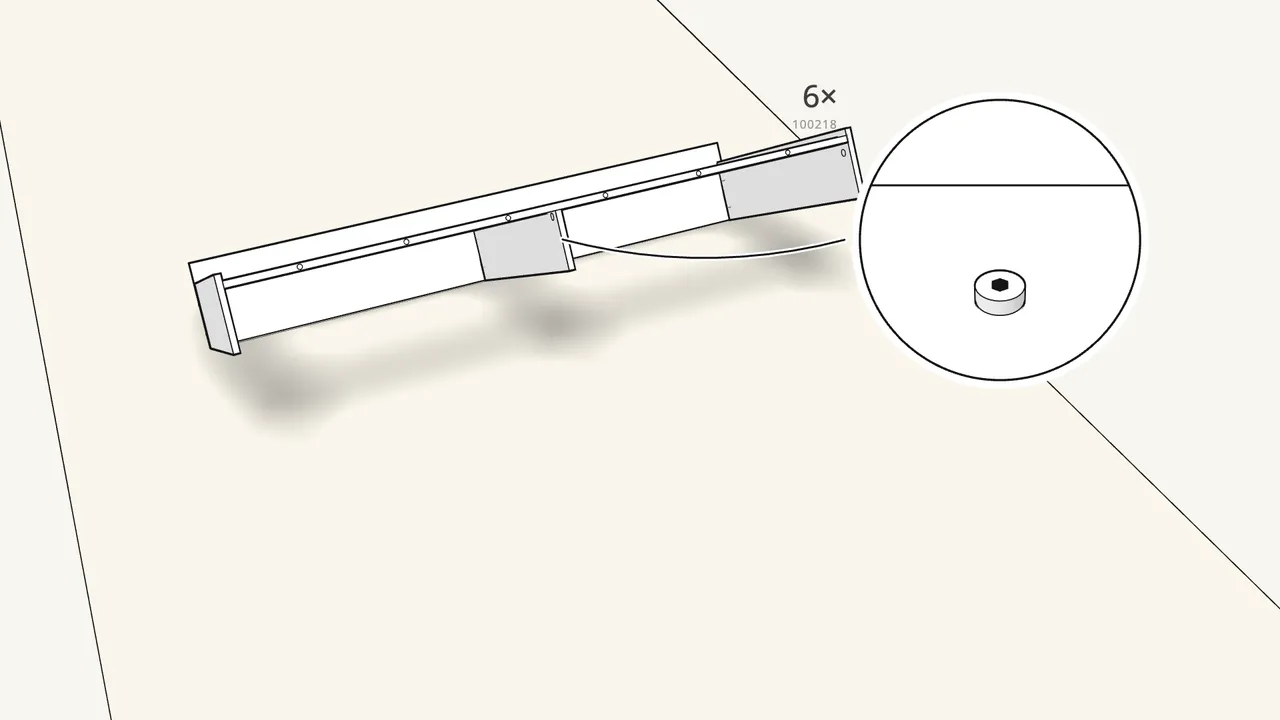
Step 11 · manual step 4–6
Push in 3 dowels (101345). Fix the back panel with 6 screws (100218).
Use the Allen key. Lay the unit on its back, then lock 2 cam locks (119030).
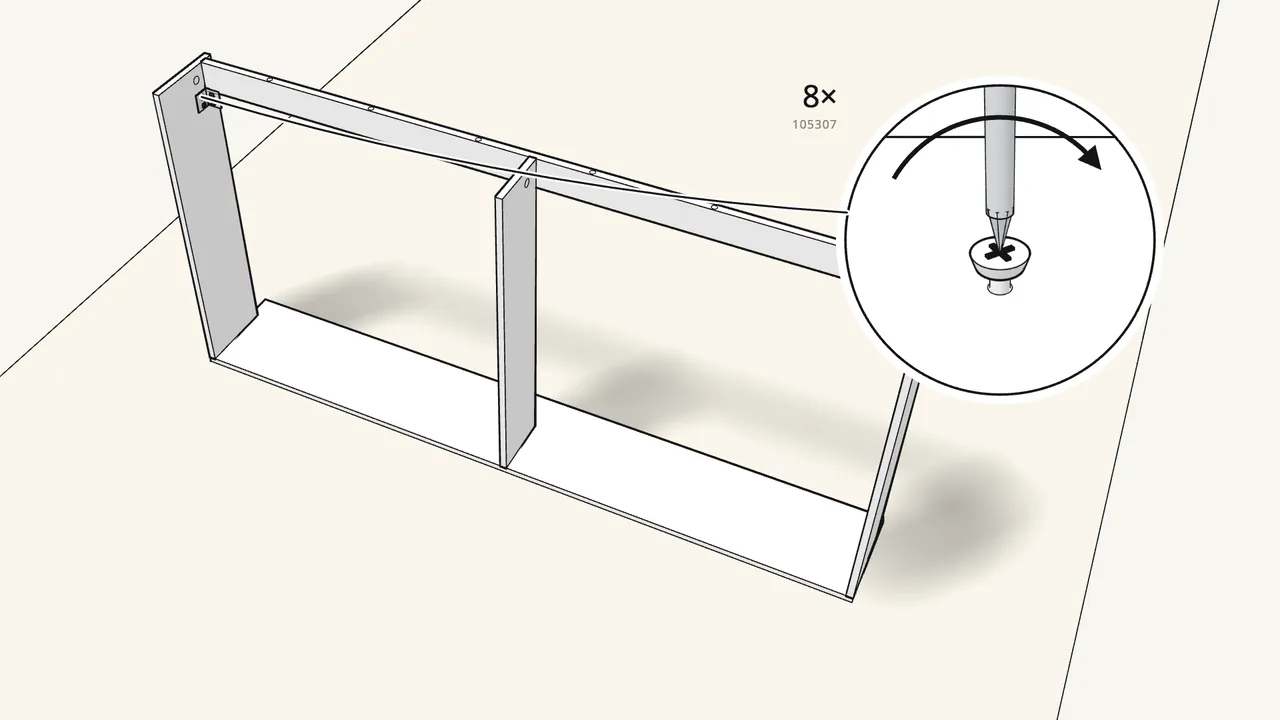
Step 12 · manual step 7
Screw on 2 brackets (103058) with 8 screws (105307).
One bracket at each end of the front rail.
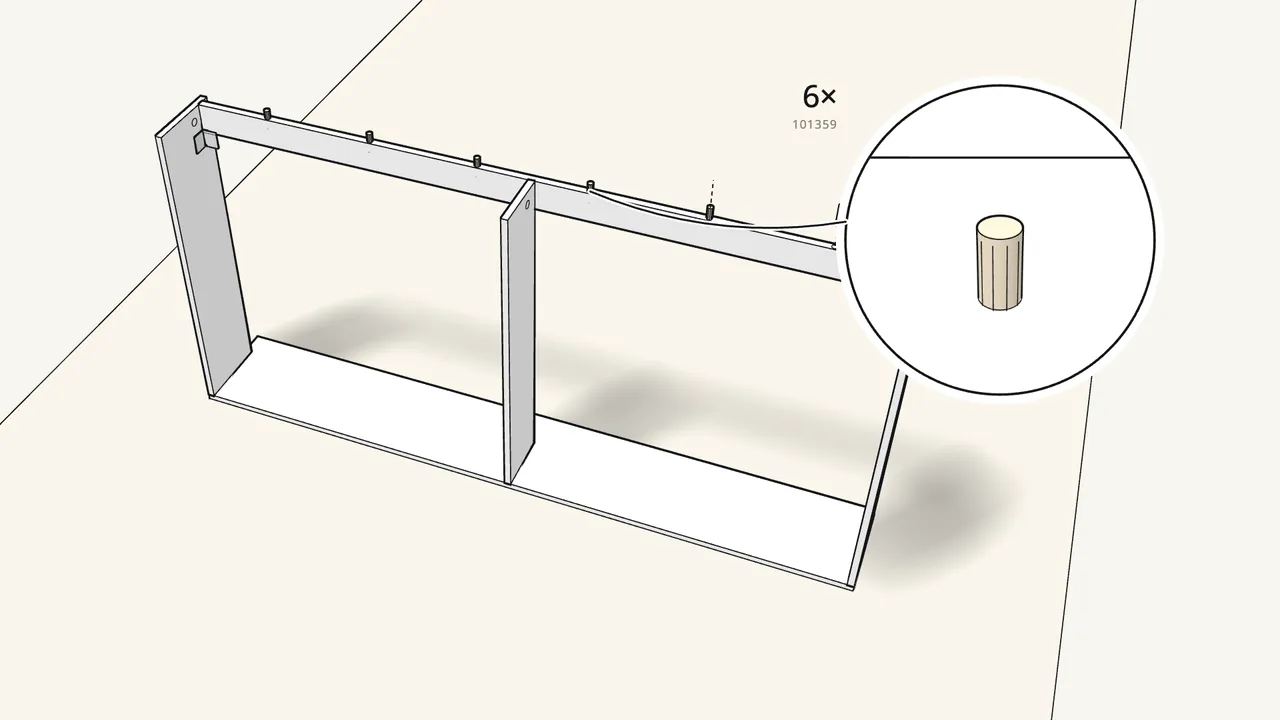
Step 13 · manual step 8
Push 6 dowels (101359) into the edge of the front rail.
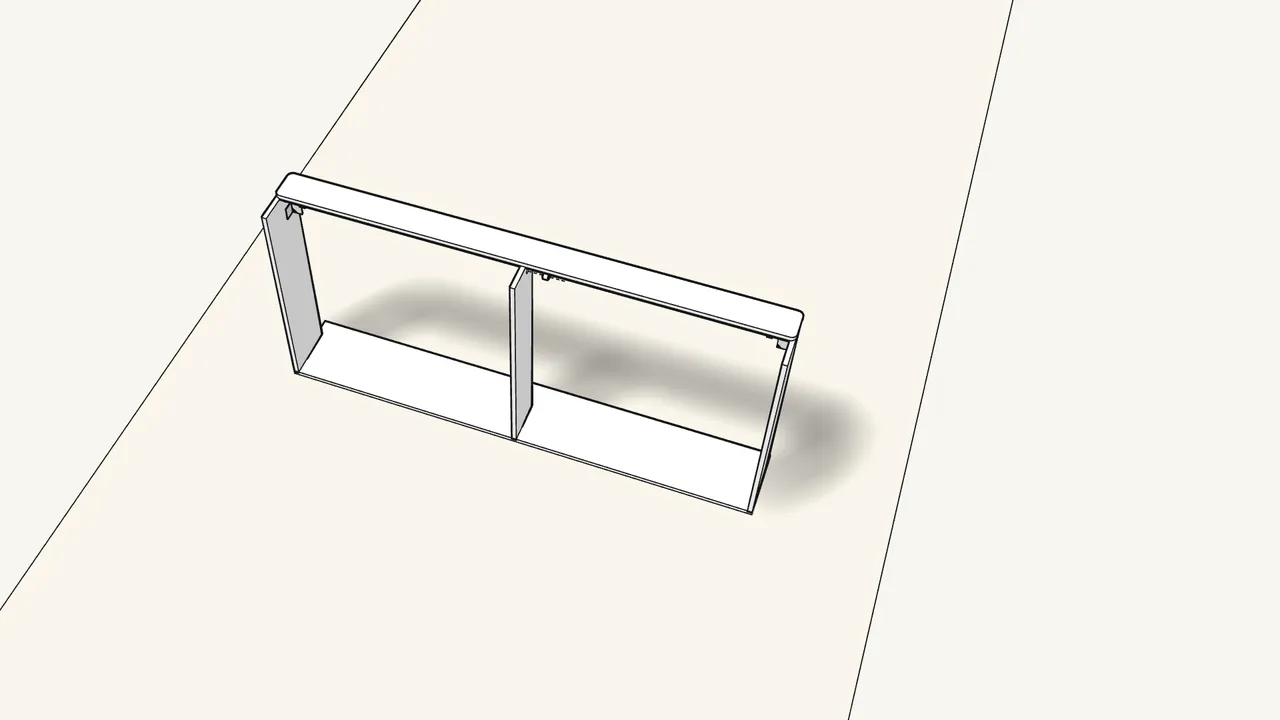
Step 14 · manual step 9–10
Screw 4 cam bolts (118331) into the front board and fit it.
Lock it with 4 cam locks (119030) and the flat screwdriver.
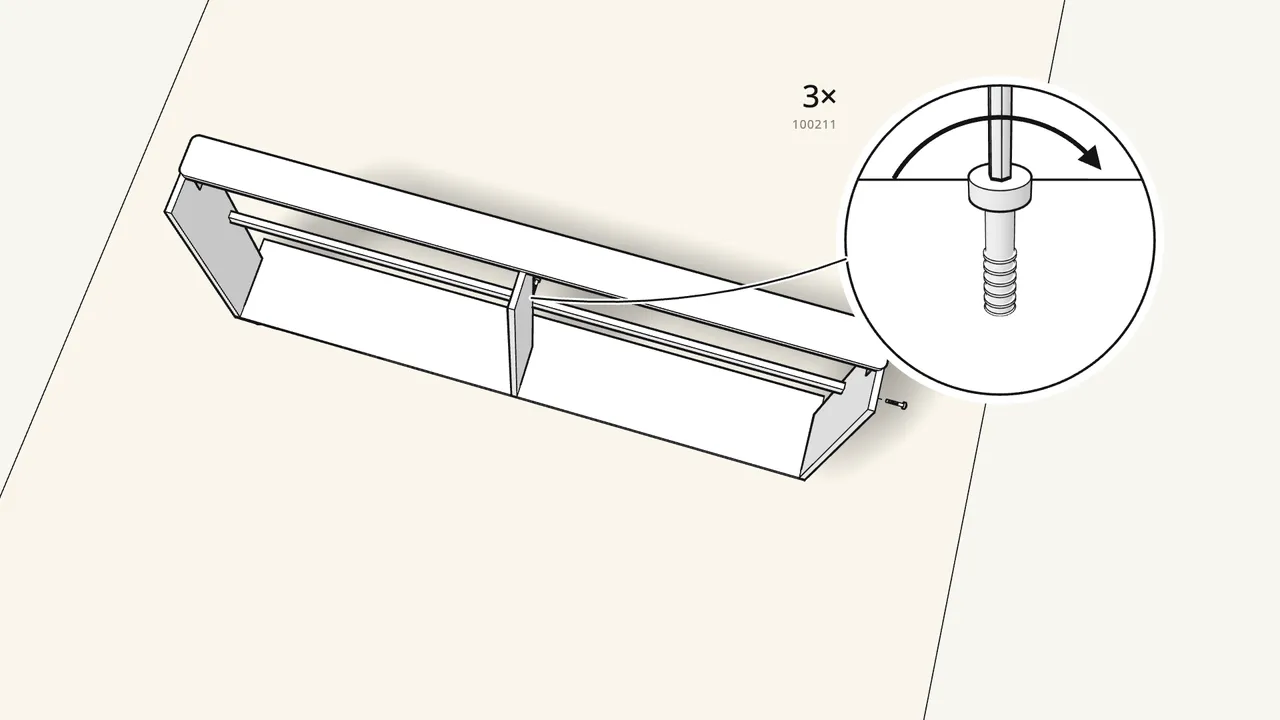
Step 15 · manual step 11–12
Fix 2 slat holders (191315) with 2 bolts (107628).
Then the middle support: 3 screws (100211) with the Allen key.
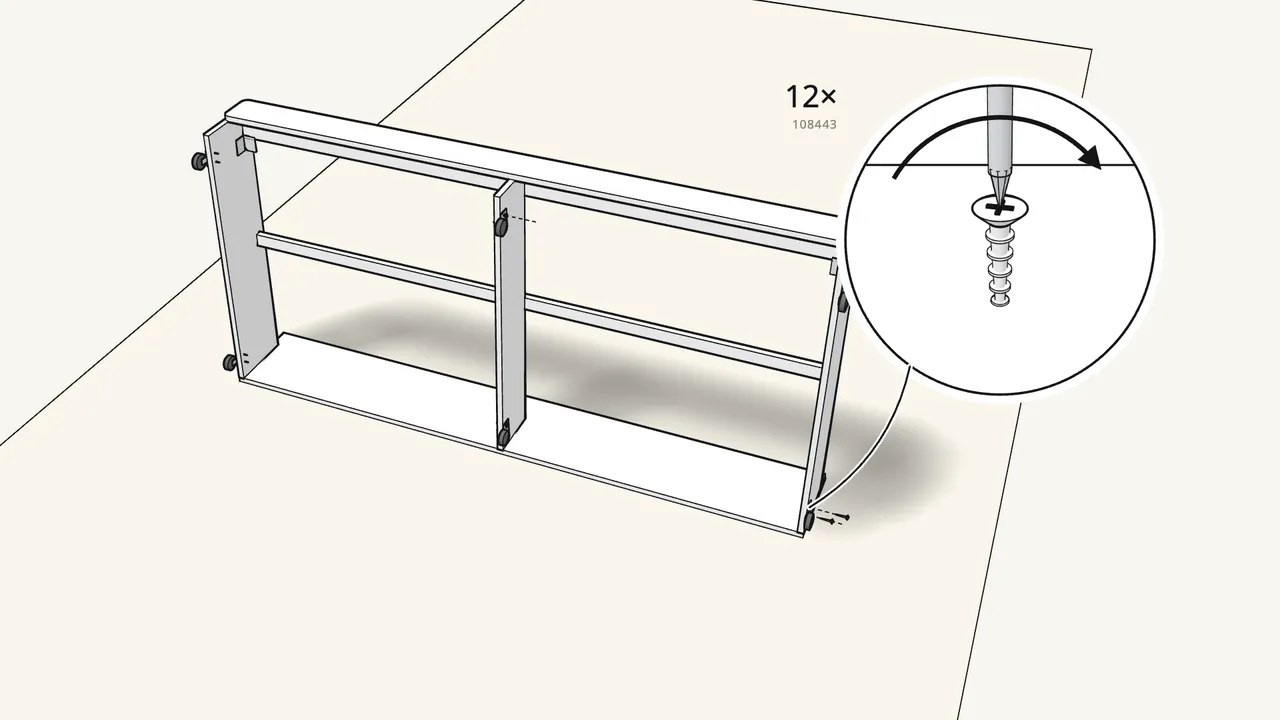
Step 16 · manual step 13
Screw on the 6 castors (111401): 12 screws (108443).
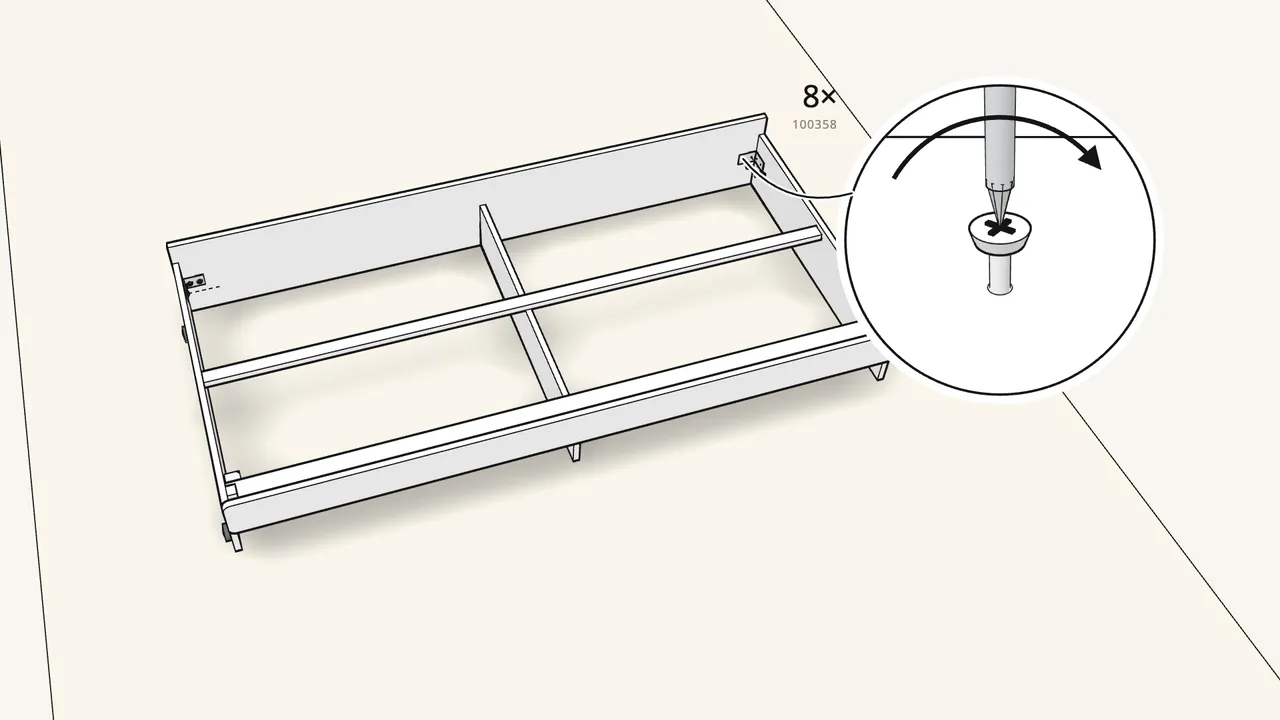
Step 17 · manual step 14
Stand the unit up. Fix 2 corner brackets (157415).
8 screws (100358).
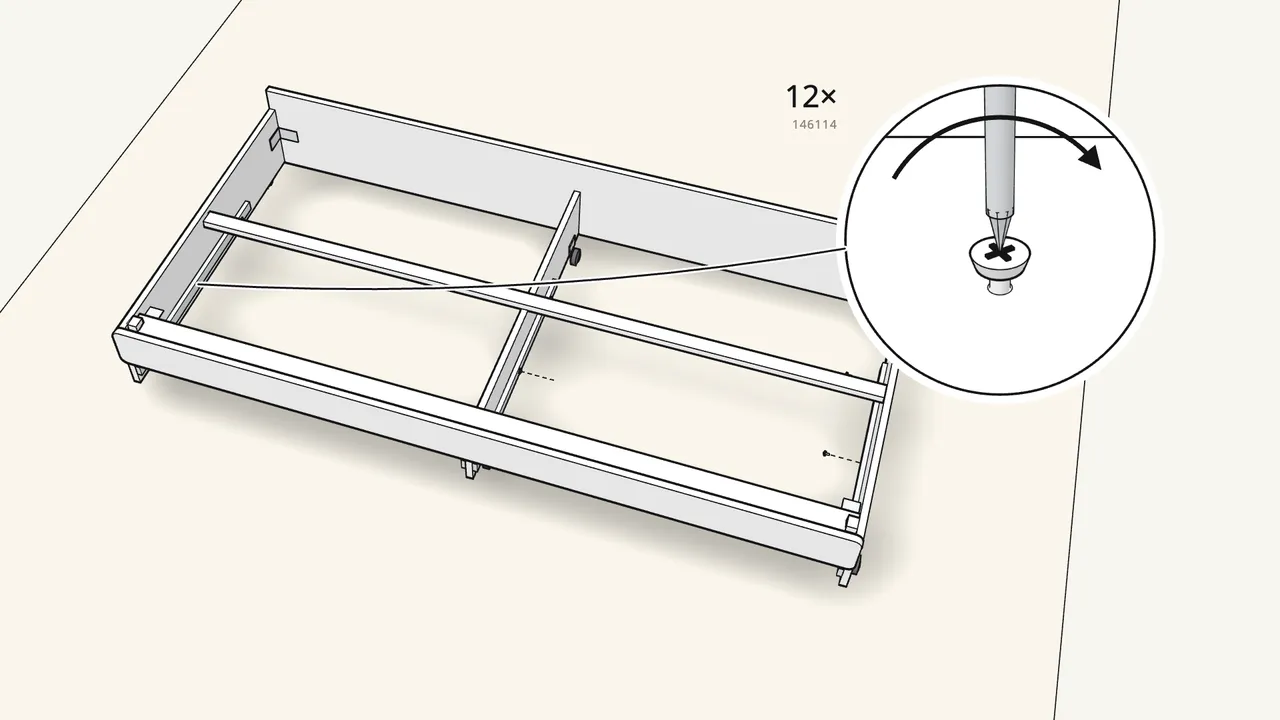
Step 18 · manual step 15
Screw on the 4 drawer runners (CR/CL): 12 screws (146114).
Check the CR/CL labels on the runners — see the manual, step 15.
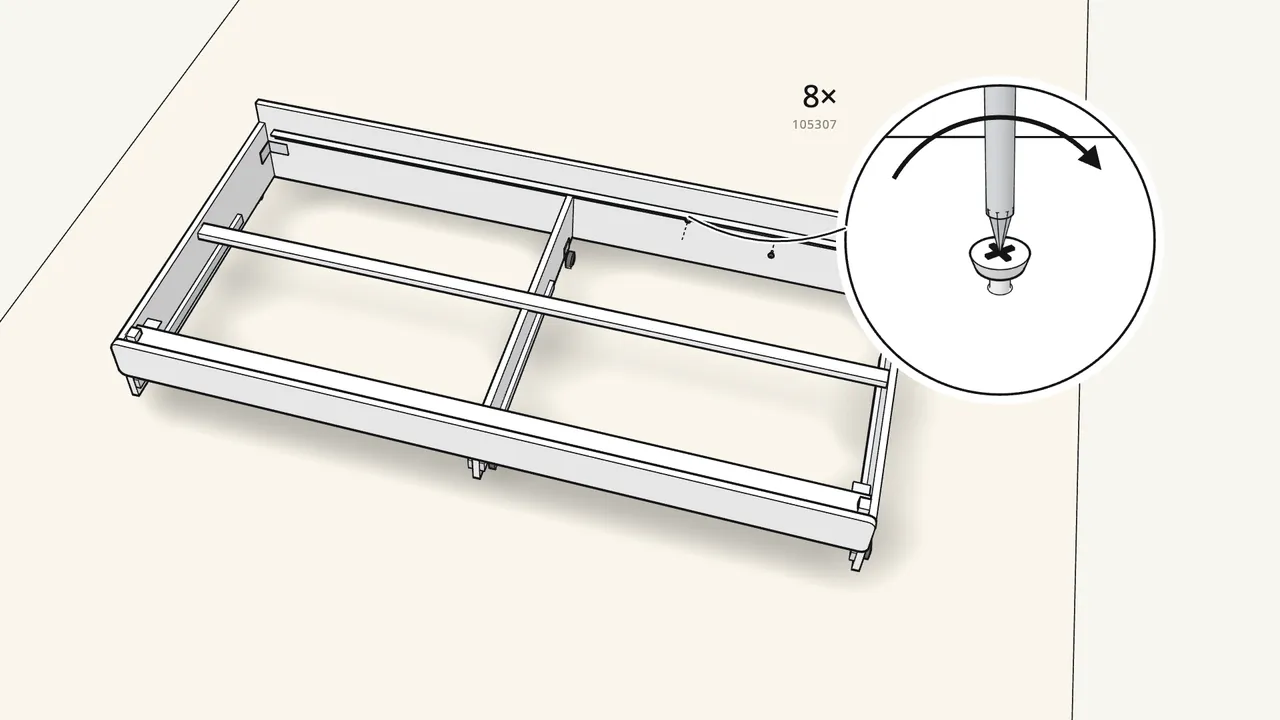
Step 19 · manual step 16
Screw the slat rail onto the back panel: 8 screws (105307).
By hand — no power drill.
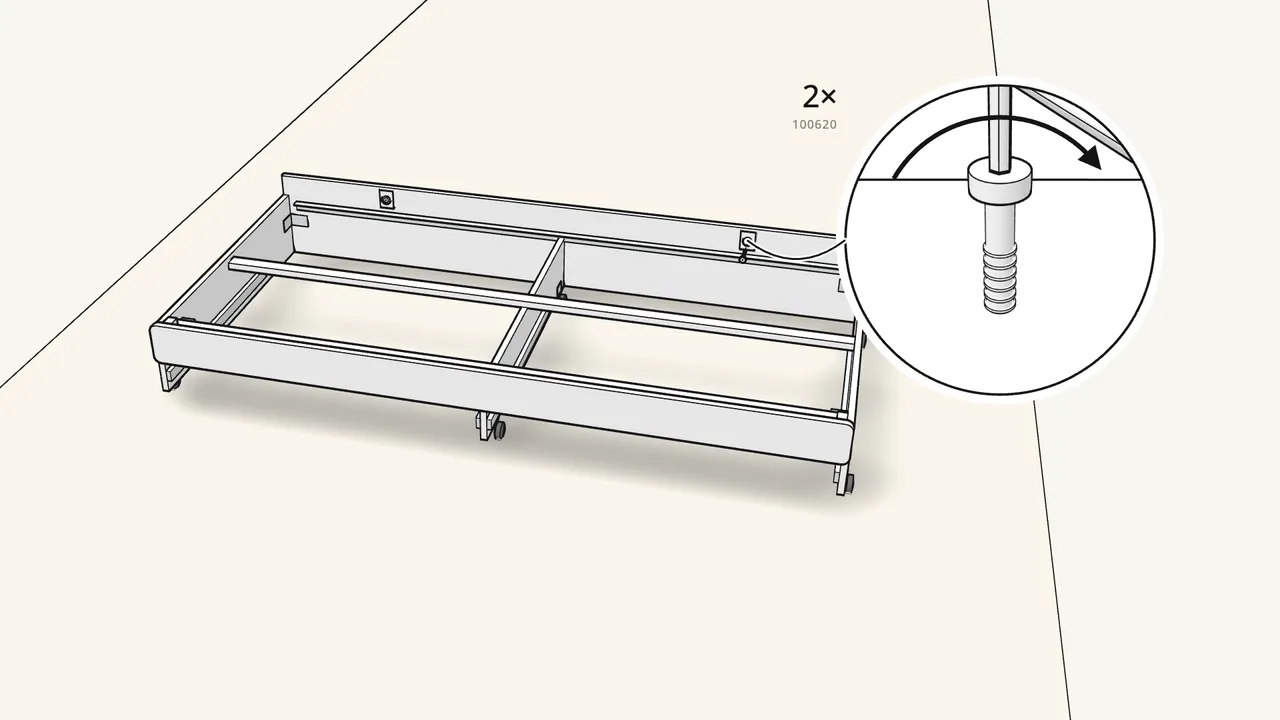
Step 20 · manual step 17
Fit the 2 locks to the top of the back panel.
Parts 157964/157965 with 100620 and 157366 — Allen key 100002. See the manual, step 17.
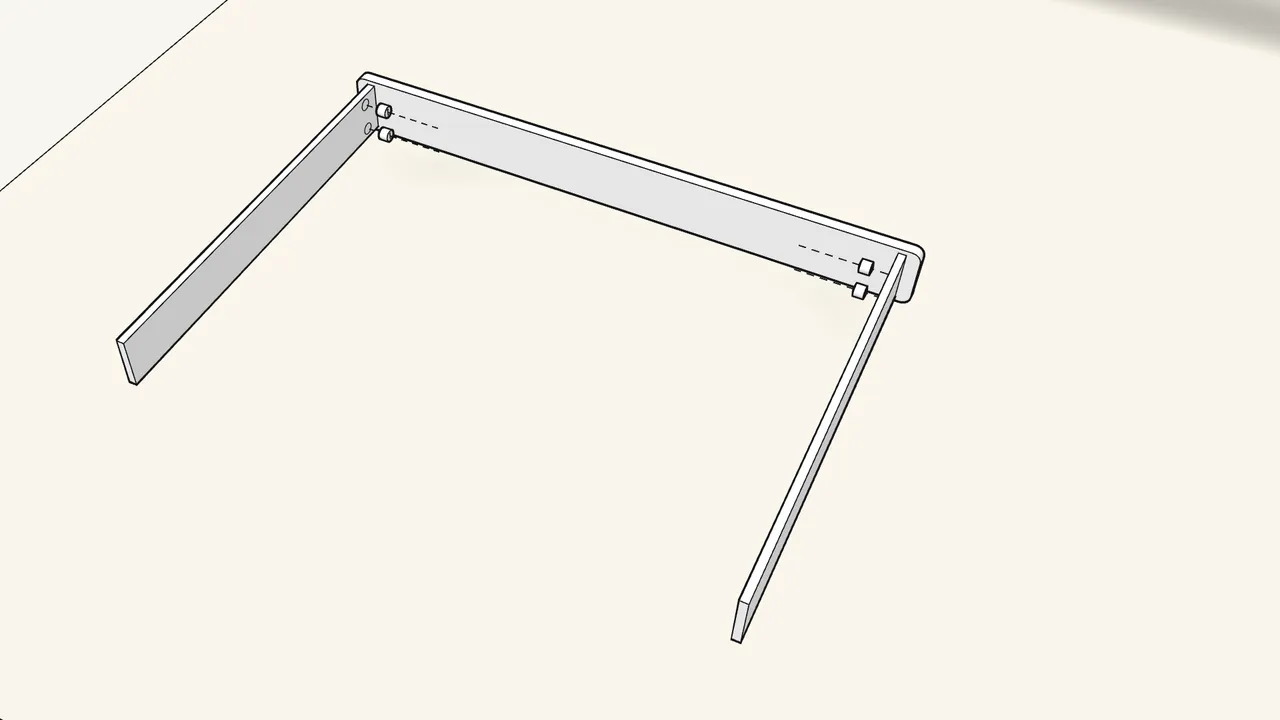
Step 21 · manual step 18–19
Drawer: 4 cam bolts (118331) and 2 dowels (101345) in the front.
Push the sides on and lock 4 cam locks (119030).
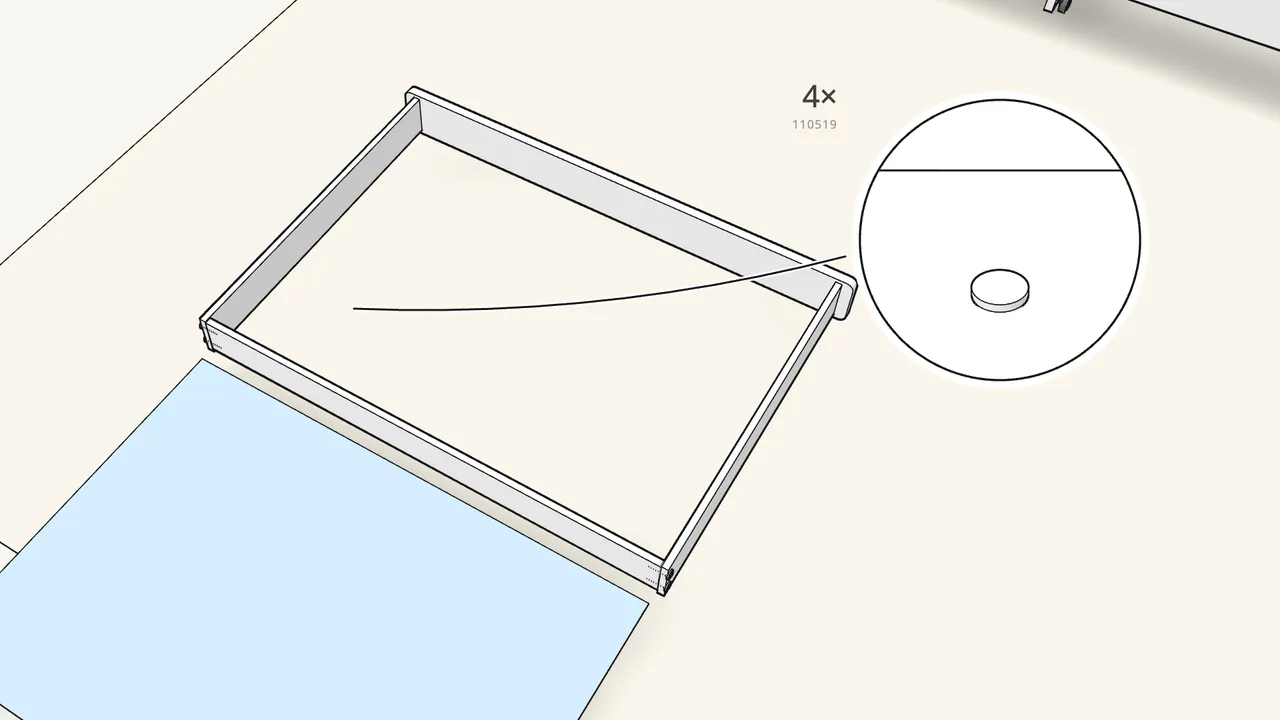
Step 22 · manual step 20–21
Fit the back: tap in 4 screw dowels (110519).
Then slide in the bottom.
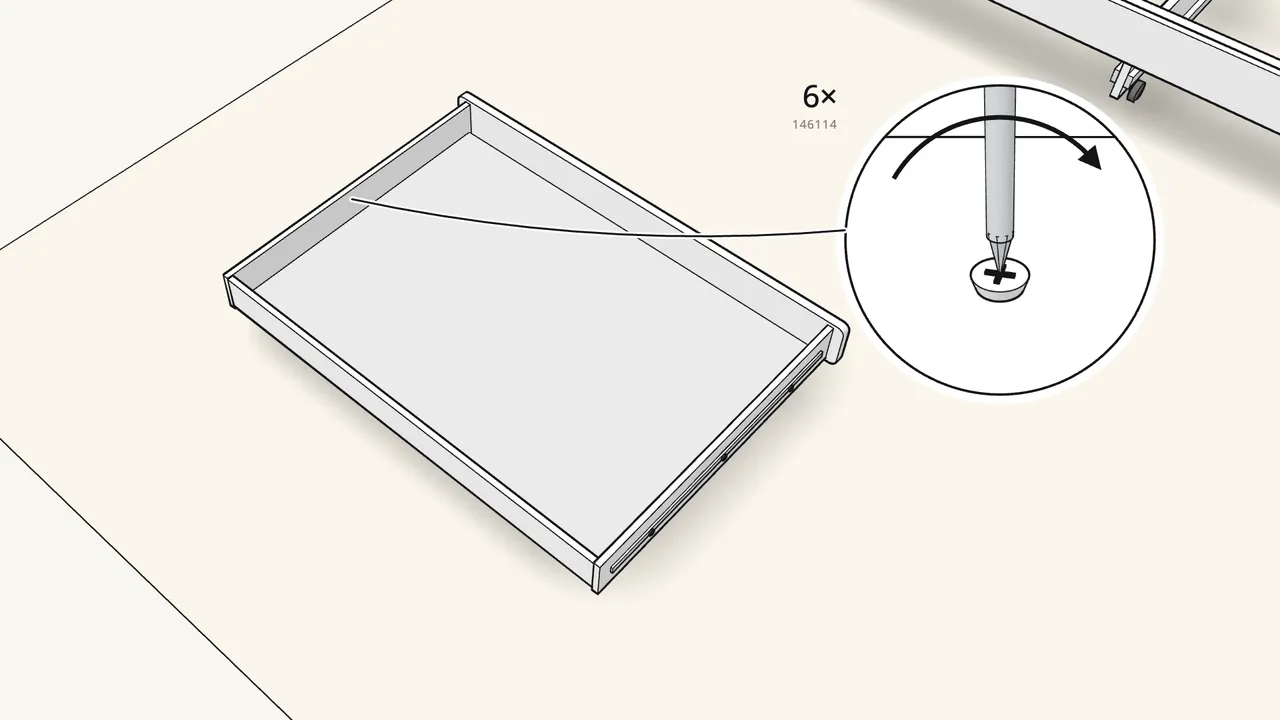
Step 23 · manual step 22–24
Screw the runners DL/DR onto the drawer: 6 screws (146114).
Fit the rod (121245) under the bottom with 2 screws (100359).
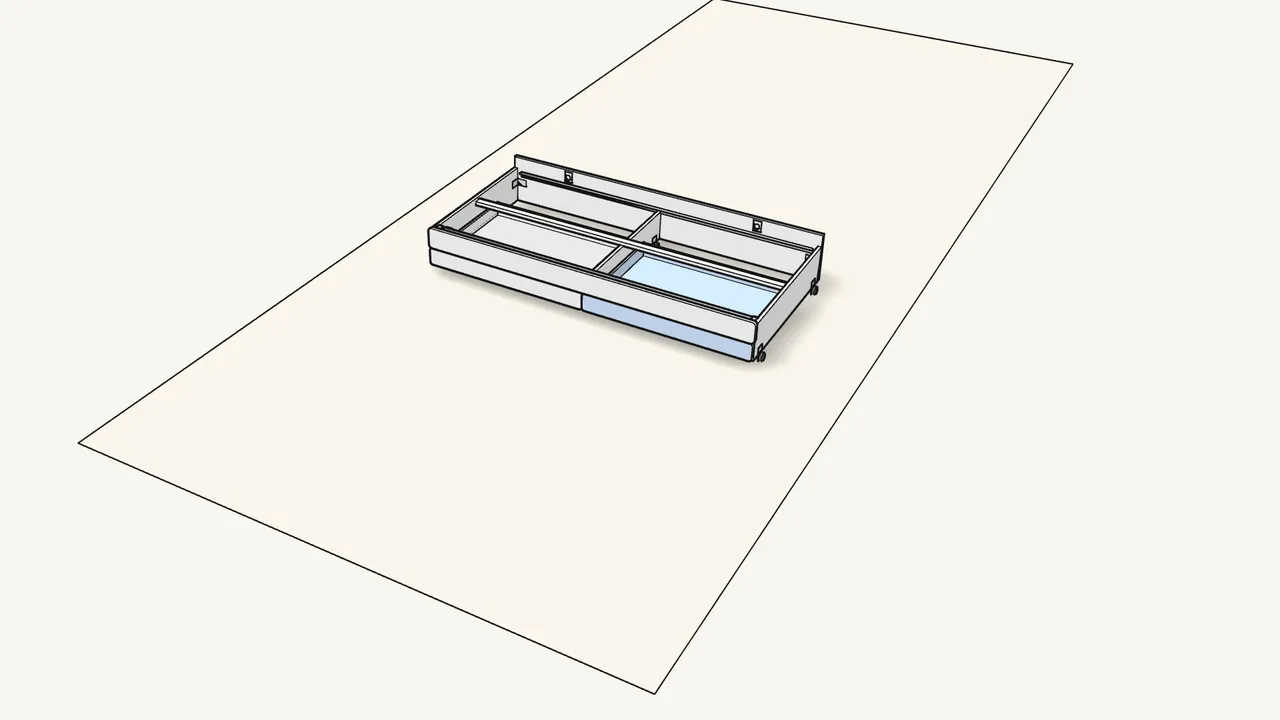
Step 24 · manual step 18–25
Build the second drawer the same way. Slide both in.
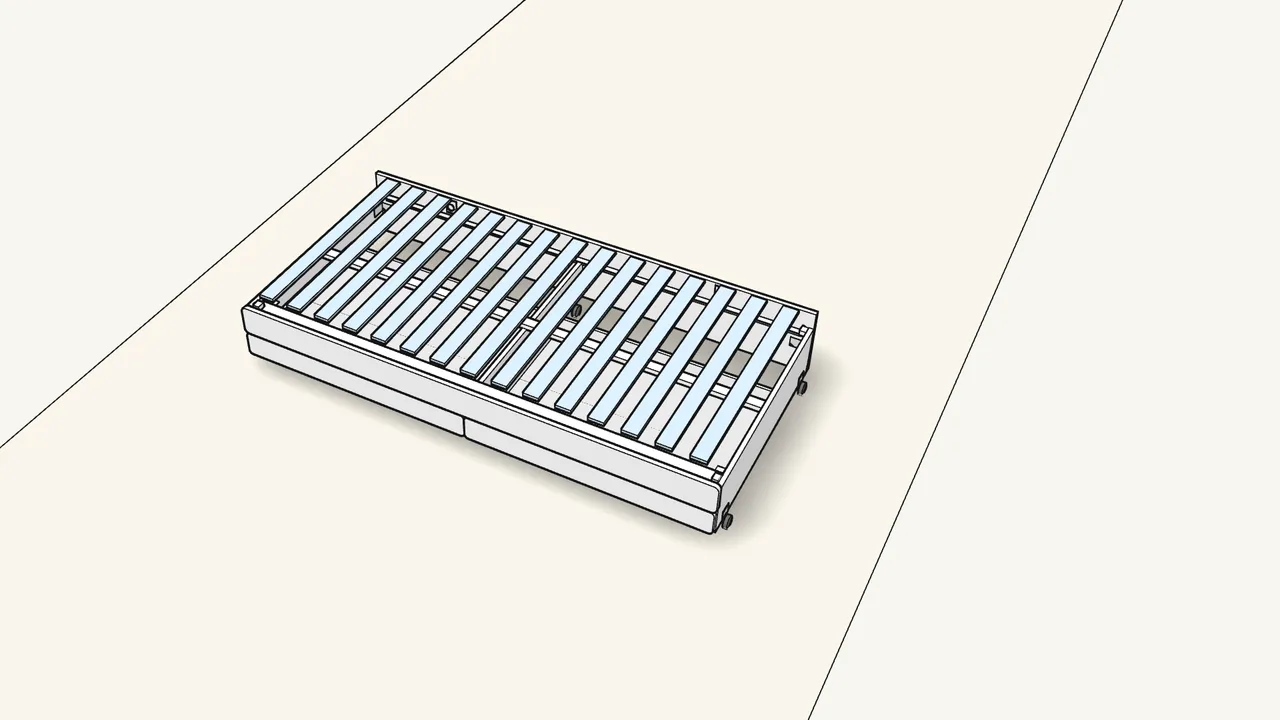
Step 25 · manual step 26–28
Fix 2 more slat holders (191315), then lay in the slatted base.
Curved side up; tuck the 4 end straps under the slat holders.
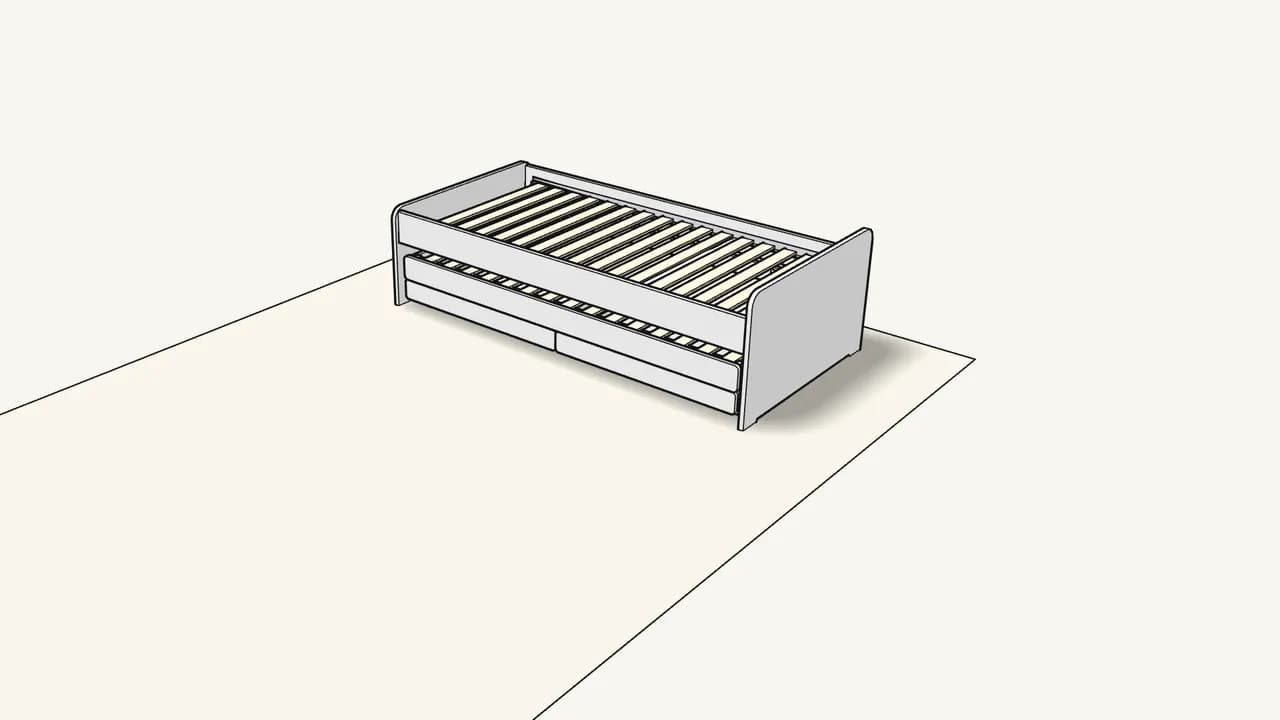
Step 26 · manual step 29
Push the pull-out bed under the bed frame.
Then turn the 2 locks on its back panel — see the manual, step 29.
Tips & safety
- Pull-out bed mattress: max 10 cm thick. As shown on the last page of the pull-out bed manual.
- The 2 locks on the back panel lock and unlock the pull-out bed. See the last page of the pull-out bed manual.
Official instructions
This guide follows IKEA's official assembly instructions (AA-2000760-7 + AA-2007924-5). Keep the printed manual to hand — if anything differs, the manual is right.